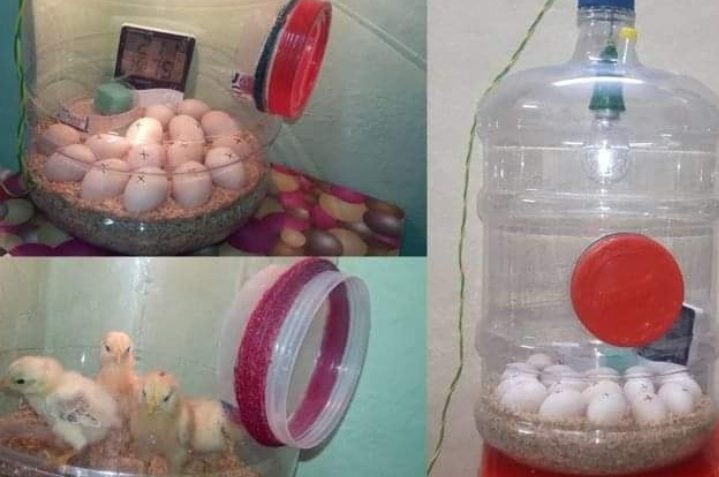
Materials Needed:
• Plastic bottle of 5 litres or larger
• Small light bulbs or heat lamps
• Thermometer and hygromometer
• Egg carton or foam for stabilization
• Tools for cutting and making holes (scissors, drill)
Steps:
1. Preparation of the bottle:
or Clean the plastic bottle thoroughly.
or Place the bottle sideways and cut a large opening on the narrower side to make the door of the incubator.
2. Heat Source Settings:
or Install light bulbs or heat lamps on the top or sides of the bottle for uniform heating.
or Make sure to maintain a constant temperature of around 99.5°F (37.5°C).
3. Ensuring the stability of eggs:
or Place a foam layer or egg carton inside the bottle to keep eggs stable and prevent them from rolling.
4. Temperature and humidity monitoring:
or Install a thermometer and hygrometer inside the incubator to control conditions.
or Keep moisture between 45-55% during incubation and 65-75% for the last three days before hatching.
5. Ventilation:
or Make small holes in the bottle to allow fresh air to flow and control humidity.
6. Manually Turning Eggs:
or Manually rotate eggs at least three times a day for uniform development.
Safety tips:
• Constantly monitor heat sources to avoid overheating.
• Keep the incubator out of reach of children and pets.
With this guide, you will be able to build an efficient and cost-effective home incubator, allowing you to enjoy the exciting experience of incubating eggs at home. Enjoy this adventure in the world of egg incubation!
